HUMAN ANATOMY & PHYSIOLOGY I Laboratory Objectives
Instructor: Dr. Clare Hays, SI 2032; 303-615-0777, e-mail – [email protected], URL http://sites.msudenver.edu/haysc
Books and Supplies:
- Required: Your textbook: Seeley’s Anatomy & Physiology, 11th Ed.,by Van Putte, Regan and Russo including access to Mc-Graw Hill Connect;
2.Required: Your abbreviated lab manual in hard copy: Human Anatomy and Physiology Laboratory Manual, 12th Ed., Elaine N. Marieb, R.N., Ph. D. Available at Auraria Book Center;
- Optional: Dissection Guide and Atlas to the Mink, by David Smith and Michael Schenk, Morton Publishing;
4.Optional: BIO 2310 Dissecting Tools. Available in bookstore; includes a scalpel with replaceable blades, a blunt probe, and small scissors;
5.Not required, but strongly recommended, is a lab coat or an old shirt to protect your clothing. Respirators with filters and eye goggles are available upon request.
Upon completion of lab exercises, you should review the material, as there are no open lab hours. Lab exams are NOT comprehensive.
JANUARY 19 – HISTOLOGY
Resources: Van Putte Textbook: Chapter 4.
Epithelium
- Identify: Simple squamous epithelium and Simple cuboidal epithelium on your kidney slide.
- Identify:Simple columnar epithelium on your stomach or jejunum (small intestine) slide.
- Identify:Stratified squamous epithelium on your palatine tonsil slide.
- Identify: Transitional epithelium on your urinary bladder slide or on a slide from your instructor.
- Identify:Pseudostratified columnar epithelium on your trachea slide or on a slide from your instructor. Note the cilia.
Muscle tissue
- Identify: Skeletal muscle.
- Identify: Cardiac muscle.
- Identify: Smooth muscle.
Nervous tissue
- Identify:Nervous tissue on your cerebral cortex slide or on a multipolar neuron slide from your instructor.
Connective tissue
- Identify:Areolar (loose) connective tissue.
- Identify:Adipose tissue.
- Identify:Dense (fibrous) regular connective tissue (slide says “white fibrous connective tissue”).
- Identify: Hyaline cartilage.
- Identify: Bone on your compact bone slide.
JANUARY 26, FEBRUARY 2, 9 – SKELETAL SYSTEM (ANATOMY)
Resources: Van Putte Textbook: Chapter 7. Please refer to Table 7.2 in textbook as needed for bony features definitions.
Recommended time schedule: Week 2 – Through the skull; Week 3 – through the upper extremity; Week 4 – finish and review.
Section 7.2 in Textbook: AXIAL SKELETON – You are responsible for the following:
AXIAL SKELETON: SKULL
CRANIAL BONES: (Note: Terms in all capital letters are the bones and terms following them are features on that bone.)
FRONTAL (1), Supraorbital foramen (or notch), Glabella, PARIETAL (2), Sagittal suture, Coronal suture, TEMPORAL (2), Squamous or Squamosal suture, Zygomatic process, Mandibular fossa, External auditory (=acoustic) meatus (=canal), Styloid process, Mastoid process, Stylomastoid foramen, Jugular foramen, Carotid canal, Internal acoustic meatus (=canal), OCCIPITAL (1), Lamdoidal or Lambdoid suture, Foramen magnum, Occipital condyles, Hypoglossal canal, External occipital crest and protuberance, SPHENOID (1), Greater wings, Superior orbital fissures, Sella turcica, Lesser wings, Optic foramina or canals, Foramen rotundum, Foramen ovale, Foramen lacerum, Foramen spinosum, ETHMOID (1), Crista galli, Cribriform plates with olfactory (=cribriform) foramina, Perpendicular plate, Superior and medial (=middle) nasal conchae (These nasal conchae, along with inferior nasal conchae make up the “turbinates.”).
FACIAL BONES:
MANDIBLE (1), Body, Rami (sing. ramus), Mandibular condyle, Coronoid process, Angle, Mental foramina, Mandibular foramen, Alveolar margin, Mandibular symphysis, MAXILLA (2), Alveolar processes, Palatine processes, Infraorbital foramen, PALATINE (2), ZYGOMATIC (2), LACRIMAL (2), Nasolacrimal canals for ducts, NASAL (2), VOMER (1), INFERIOR NASAL CONCHAE (2).
HYOID BONE.
Frontal sinus, Ethmoidal sinuses, Sphenoidal sinus, Maxillary sinus.
Observe the fontanels (soft spots) on the fetal skeleton.
AXIAL SKELETON: VERTEBRAE, STERNUM and RIBS:
TYPICAL VERTEBRA, Body, Vertebral arch, Vertebral foramen, Transverse processes, Spinous process, Superior and inferior articular processes with smooth articular surfaces called facets, Intervertebral foramina, intervertebral discs.
CERVICAL VERTEBRAE (7), atlas, axis, odontoid process (= dens), THORACIC VERTEBRAE (12), LUMBAR VERTEBRAE (5), SACRUM (5 fused sacral vertebrae), COCCYX (3-5 fused).
STERNUM, Manubrium, Body, Xiphoid process, Jugular notch, Sternal angle.
RIBS, Head, Tubercle, Costal cartilage.
Section 7.3 in Textbook: APPENDICULAR SKELETON – You are responsible for the following:
APPENDICULAR SKELETON: PECTORAL GIRDLE
CLAVICLE, SCAPULA, Acromion process, Coracoid process, Glenoid fossa [cavity], Scapular spine, Supraspinous fossa, Infraspinous fossa, Subscapular fossa.
APPENDICULAR SKELETON: PECTORAL APPENDAGE
HUMERUS, Head, Shaft, Greater and lesser tubercles, Intertubercular (=bicipital) groove, Deltoid tuberosity, Trochlea, Capitulum, Medial and lateral epicondyles, Coronoid fossa, Olecranon fossa, RADIUS, Head, Radial tuberosity, Styloid process, ULNA, Coronoid process, Olecranon (process), Semilunar (=trochlear) notch, Styloid process, CARPAL BONES (8), METACARPALS (I-V), PHALANGES (Proximal, Middle, Distal).
APPENDICULAR SKELETON: PELVIC GIRDLE
OS COXA (Coxal bone when 3 parts are fused), ILIUM, Sacroiliac joint, Iliac crest, Anterior superior spine, Posterior superior spine, Anterior inferior spine, Iliac fossa, ISCHIUM, Ischial tuberosity, Lesser and greater sciatic notches, Ischial ramus, PUBIS, Obturator foramen, Pubic symphysis, Pubic ramus, Acetabulum.
APPENDICULAR SKELETON: PELVIC APPENDAGE
FEMUR, Head, Greater and lesser trochanters, Lateral and medial condyles, Lateral and medial epicondyles, Gluteal tuberosity, Linea aspera, PATELLA, TIBIA, Medial and lateral condyles, Tibial tuberosity, Medial malleolus, FIBULA, Lateral malleolus, TARSAL BONES (7), Calcaneus, Talus, METATARSALS (I-V), PHALANGES (Proximal, Middle, Distal).
FEBRUARY 16 – EXAM ONE
FEBRUARY 23, MARCH 2, MARCH 9 – MUSCULAR SYSTEM (ANATOMY)
Resources: Glance at page 2 in a copy of the Mink Lab Manual to understand anatomic terminology of the quadriped (mink). Use Van Putte Textbook Section 4.5 for microscopic skeletal muscle tissue and Figure 9.17 for parts of the muscle twitch. Dissection Guide and Atlas to the Mink by David Smith and Michael Schenk has mink muscles in Chapter 3.
Useful youtube mink dissectionvideos:
https://youtu.be/Ri2O3MbPGtM (starting your dissection, fat and fascia removal)
https://youtu.be/5DzkwUfwMN0 (trapezius & latissimus dorsi)
https://youtu.be/-5Th5HbfjFs (neck and arm)
https://youtu.be/J-Va8D_Y-CU (thigh)
Recommended time schedule: Week 6 – Review a microscope slide of skeletal muscle tissue. Then, dissect mink at least through infraspinatus on the list that follows; Week 7 – Try to finish mink muscles so that you can review the following week; Week 8 – Review mink muscles and review the muscle twitch. You will also be expected to know the three phases of a muscle twitch (latent, contraction & relaxation). See Figure 9.17 in your Van Putte textbook.
Mink Dissection: There are enough mink so that every 3-4 people
may have one mink. The mink may not leave the laboratory room! Dissect as described by your instructor and with the help of the dissection photographs provided. Put your mink away as described by your instructor when your dissection is complete. Clean your working area thoroughly.
Why do we dissect? With all of the great technology tools, like 3-d imaging, why do we dissect in lab? The physical act of dissection is an extremely effective learning tool in contrast with “virtual dissections” available in computer programs. Dissection is the best way to provide a tactile sense of body tissues. In fact the word “anatomy” comes from Greek “to dissect” or “cut up.” Currently, even with virtual reality headsets, nothing can reproduce the learning of anatomy through your actual tactile sense (in addition to other senses). This experience will help you touch, visualize, and separate tissues in order to learn them. Most A&P students are pursuing careers in healthcare. At some point, this experience in dissection will help in the diagnosis and/or treatment of your patients. For example, it is how we know that muscle won’t hold stitches well but tendons will. Or, if you are a first responder at a car wreck at night, you may only have your sense of touch to immediately decide what to do.
Why do we dissect mink? Although many students are excited about the dissections, there are still several questions that arise when it comes to the animals. There are several reasons why this choice of dissection animal has been made. We do not have the space, money, nor supply of human cadavers to dissect. MSU Denver offers an upper division anatomy course to dissect a human cadaver, called Advanced Human Cadaver Anatomy. We dissect mink in A&P because once you understand that a mink’s anatomical position is on all four feet, their anatomy is very similar to that of humans. After you learn the structures on the mink, we offer cadaver “tours” towards the end of the semester, to make that transition to the human anatomy. The question of the ethics of using animals for medical science dissection and learning can and should be raised. The mink are farm-raised for their fur. Following euthanasia, their bodies are simply discarded, as they are of no use to the farmer. We purchase the bodies, so that students may at least benefit from studying their anatomy.
You are responsible for the following structures:
Neck, Chest and Abdominal Muscles: Mylohyoid, Digastric, Masseter, Pectoralis major, Pectoralis minor, Rectus abdominis, Linea alba, External oblique, Internal oblique, Transversus abdominis.
Mink dissection photographs of Neck, Chest, Abdomen: Neck and torso-site 4
Shoulder and Arm Muscles: Trapezius group (note: “group” means that you do not have to use the prefixes of clavo-, spino-, acromio-), Levator scapulae ventralis, Deltoid group, Latissimus dorsi, Serratus ventralis (=anterior), Subscapularis, Splenius, Rhomboid group (you do not need to distinguish thoracic, cervical or capitis parts of rhomboideus), Supraspinatus, Infraspinatus.Triceps brachii (lateral, medial, long head), Brachialis, Dorsoepitrochlearis (usually not separate from latissimus dorsi in humans and therefore usually not present in humans), Biceps brachii.
Mink dissection photographs of Shoulder and Arm: Mink muscles arm
Hip and Thigh Muscles: Fascia latae and Tensor fasciae latae, Gluteus medius, Gluteus maximus (superficial but small in mink), Hamstrings including: a. Biceps femoris, b. Semitendinosus, c. Semimembranosus, Sartorius, Quadriceps femoris including: a.Vastus medialis, b. Rectus femoris, c. Vastus lateralis, d. Vastus intermedius (directly deep to rectus femoris), Gracilis, Adductor femoris (=Adductor magnus and brevis in humans), Adductor longus, Gastrocnemius.
Mink dissection photographs of Hip and Thigh: Mink anatomy leg 2310-site 3
MARCH 16 – EXAM TWO
MARCH 30 –MUSCULAR ANATOMY and PHYSIOLOGY (OR PHYSIOGRIP COMPUTERIZED EXPERIMENT)
Use this time to complete the review sheet assignment which consists of completing 1. the Review Sheet in your abbreviated Marieb Laboratory Manual “Exercise 13 Review Sheet: Gross Anatomy of the Muscular System” PLUS 2. the review sheet on Skeletal Muscle Physiology found here. (Skeletal Muscle Review Sheet) You may do these review sheets at home. The two review exercises are due on your very next lab period when we dissect the brain. 10 points are possible for complete and accurate answers of each review exercise for a total of 20 points.
APRIL 6 – ANATOMY OF THE BRAIN AND CRANIAL NERVES
Resources: Van Putte Textbook Section 4.6 for typical neuron and Chapter 13 for the brain.
Sheep brain mid-sagittal section photograph: http://sites.msudenver.edu/haysc/wp-content/uploads/sites/150/2017/07/midsagittalsheepbrain.jpg
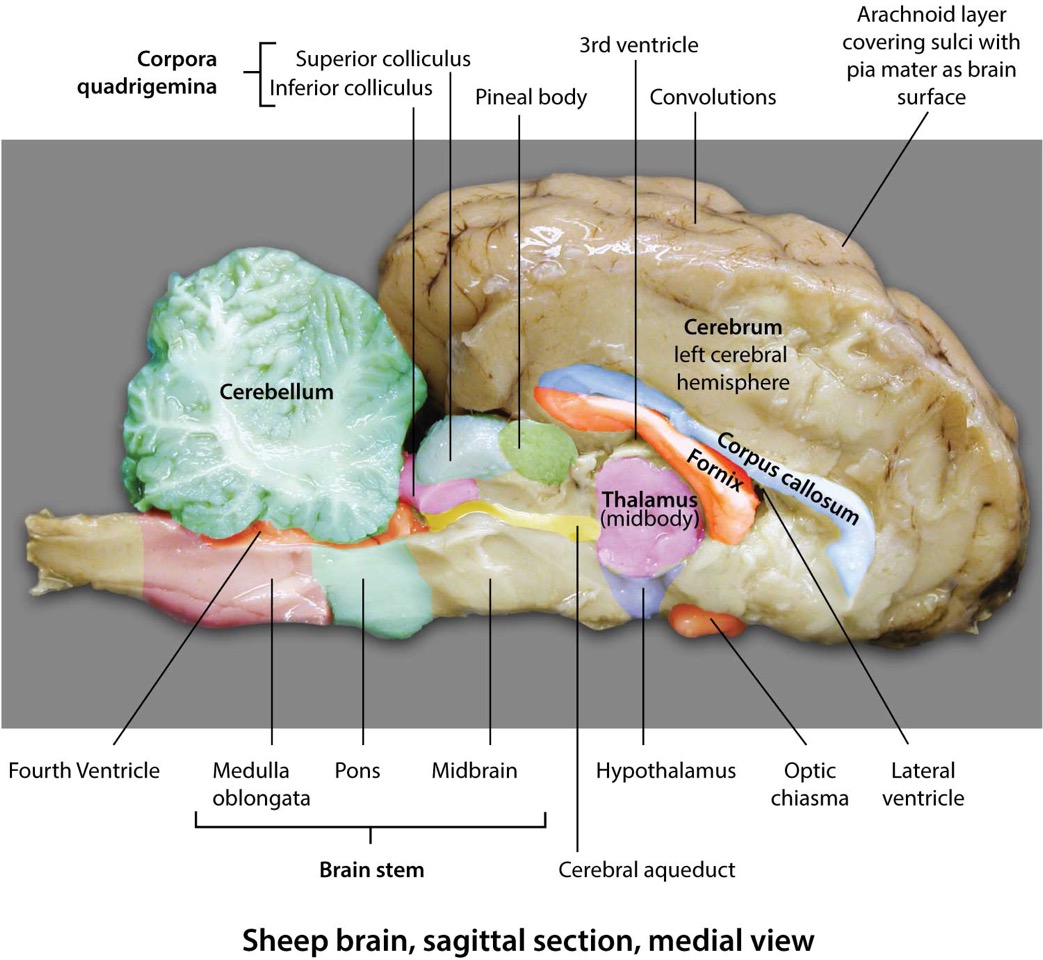
Sheep brain inferior view illustration: http://sites.msudenver.edu/haysc/wp-content/uploads/sites/150/2017/07/sheepinferiorview.jpg
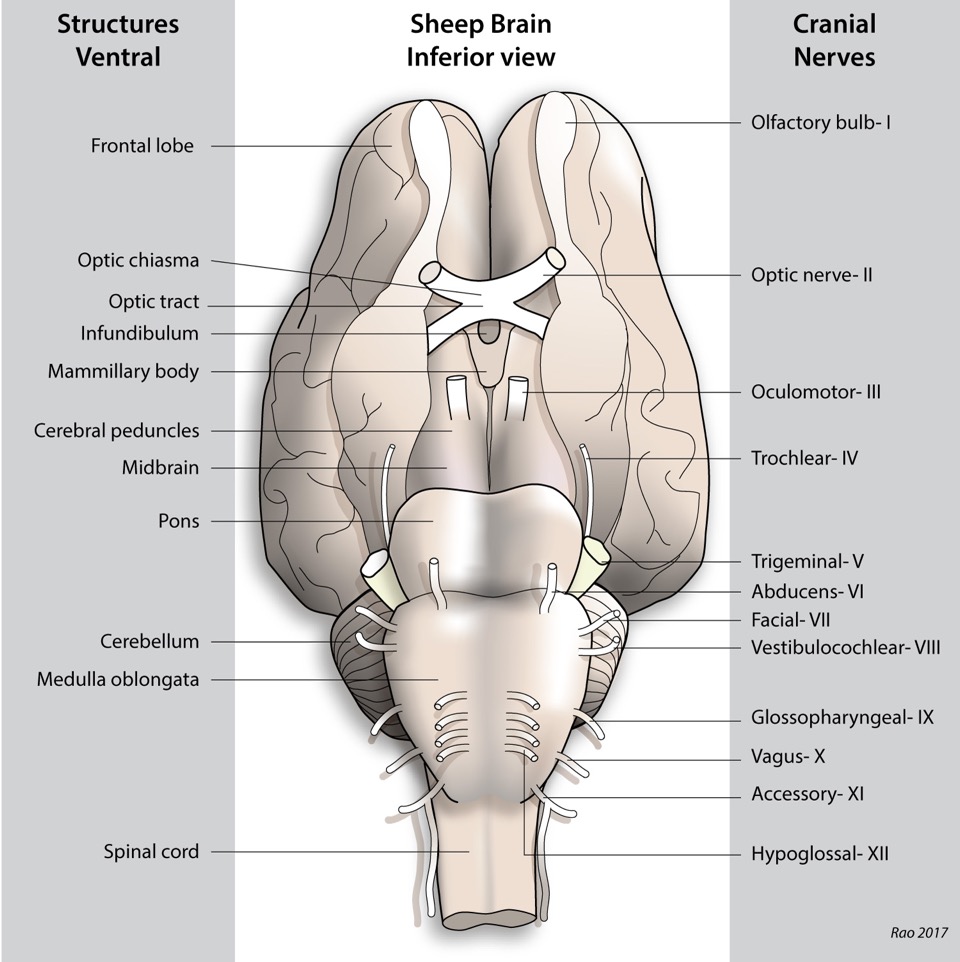
HISTOLOGY:
Observe a microscope slide of a typical neuron.
SHEEP BRAIN:
Observe the sheep brain and find the following structures: Meninges: Dura mater, arachnoid, pia mater.
Dorsal Structures: Longitudinal fissure, convolutions, cerebrum, cerebral hemispheres, cerebellum, corpora quadrigemina (superior and inferior colliculi).
Ventral Structures: Olfactory bulbs (site where olfactory nerve from nose synapses), optic nerves, optic chiasma, optic tracts, hypothalamus (infundibulum, mammillary body), cerebral peduncles, oculomotor nerve, trochlear nerve, pons, medulla oblongata, trigeminal nerve, abducens nerve, accessory nerve, and hypoglossal nerve. (Note, cranial nerves VII, VIII, IX and X are often difficult to find or missing on some of the brains.)
Internal Structures: Corpus callosum, lateral ventricle, fornix, third ventricle, thalamus, hypothalamus, pineal body, midbrain, cerebral aqueduct, fourth ventricle, cerebral peduncles, pons, medulla oblongata, and cerebellum.
APRIL 13 – PERIPHERAL NERVES of the MINK AND HUMAN REFLEXES
PERIPHERAL NERVES of the MINK:
Resources: Optional Dissection Guide and Atlas to the Mink by David Smith and Michael Schenk has mink muscles in Chapter 8.
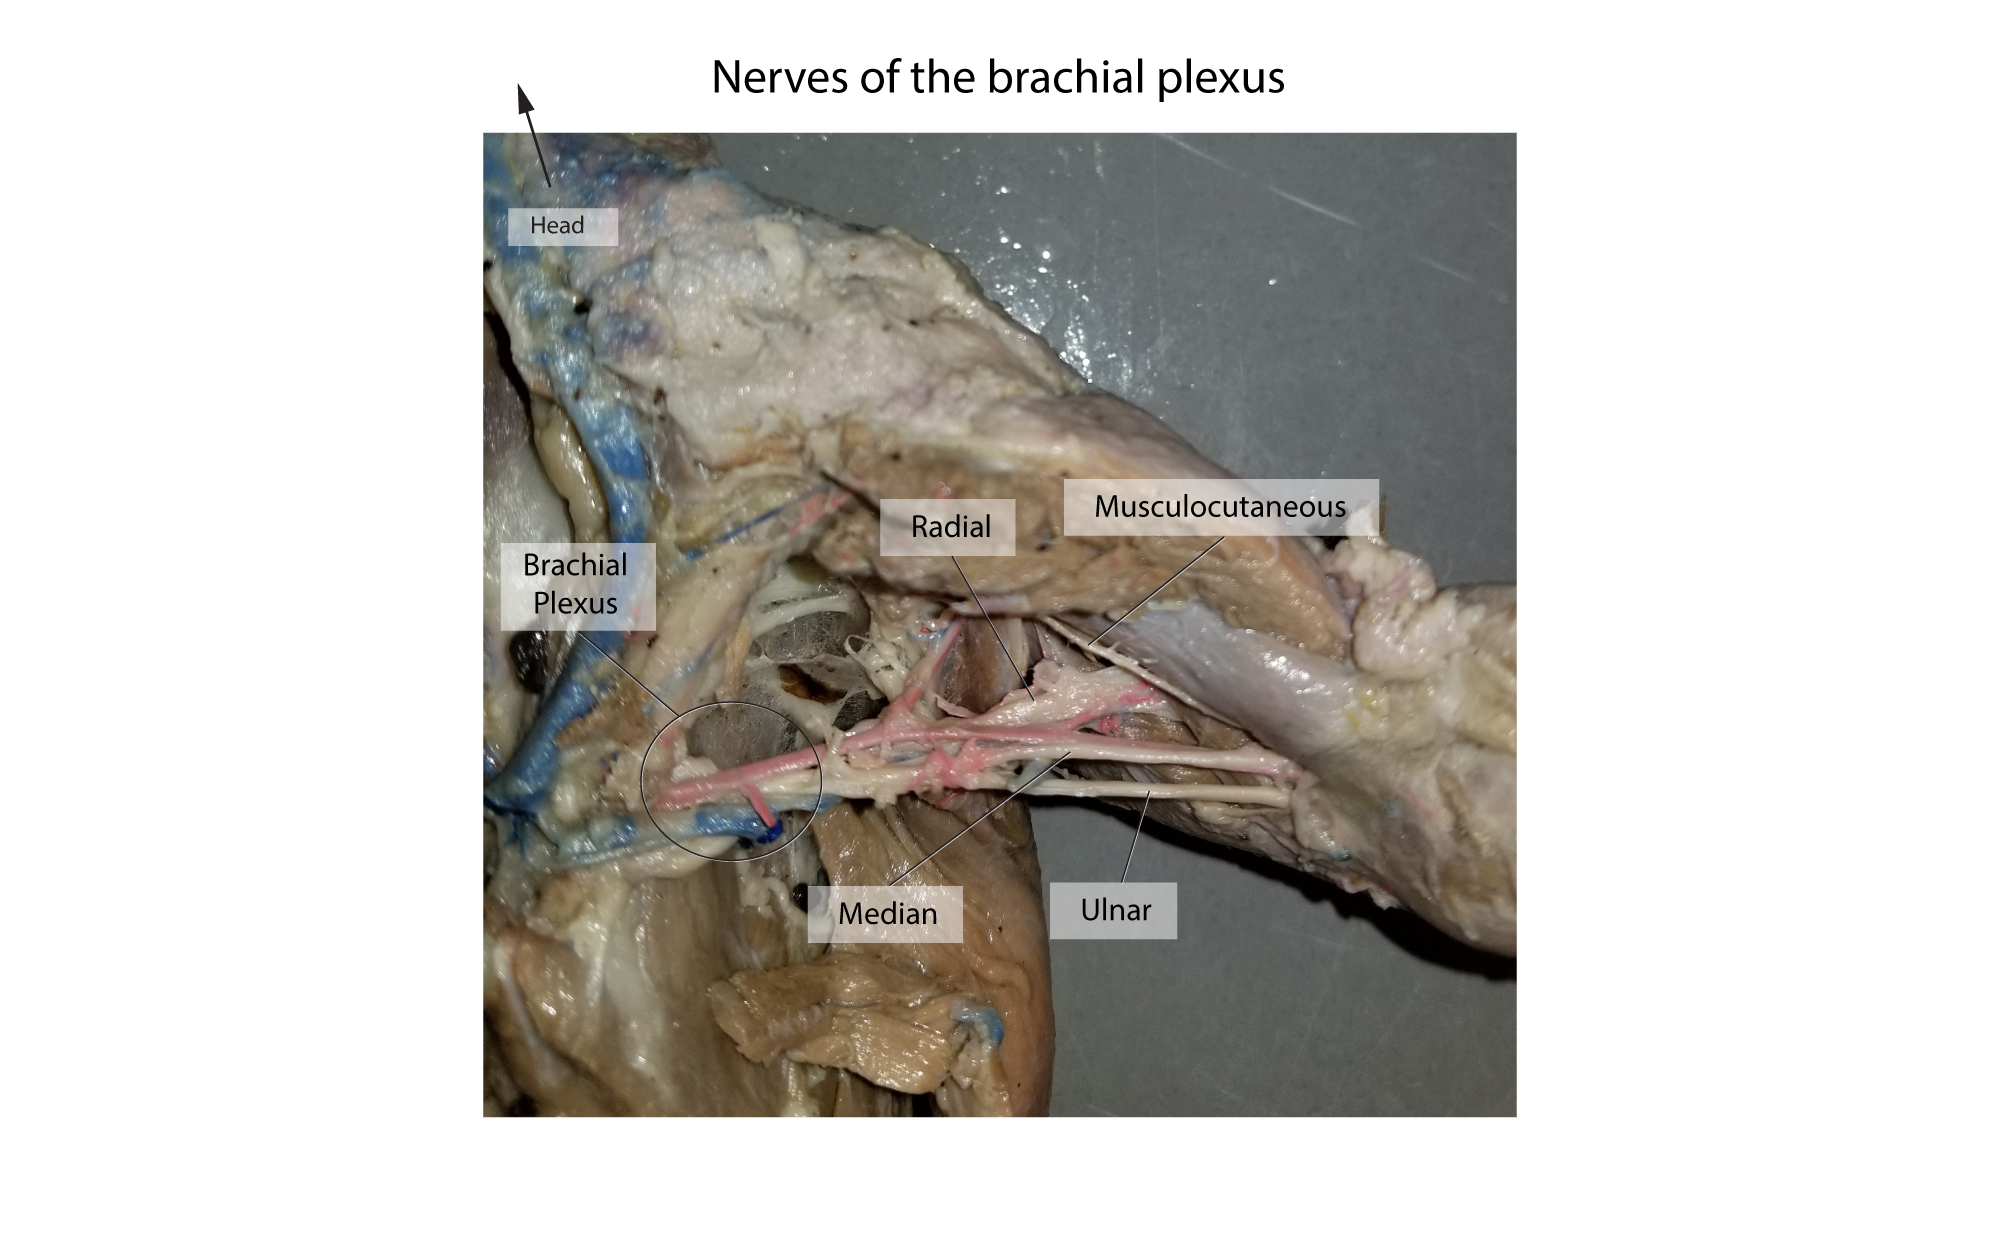
Mink peripheral nerve photographs:
Observe the following mink nerves of the Brachial Plexus: Musculocutaneous
nerve, Radial nerve, Median nerve, Ulnar nerve. Mink arm nerves.
Observe the following mink nerves of the Lumbosacral plexus: Femoral nerve with its superficial saphenous nerve branch, Sciatic nerve. Mink lateral right thigh. Mink medial right thigh.
HUMAN REFLEXES:
Resources: Chapter 12 in your Van Putte Textbook. Study the Reflex Arc illustrated in Figure 12.5 in your Van Puttetextbook or in Figure 21.1 in your Marieb Lab Manual. Exercise 21 in your abbreviated Marieb Lab Manual.
Exercise 21: Complete Activities 1-9, but omit the “Corneal
Reflex” and “Salivary Reflex”. This includes: Patellar reflex (including mental distraction, muscular activity and fatigue), Calcaneal tendon or ankle-jerk reflex, Crossed-extensor reflex, Plantar reflex (normal and Babinski’s sign), Gag reflex, Pupillary reflex (direct = ipsilateral response and indirect = consensual response), Ciliospinal reflex, Comparison of reaction time of intrinsic reflex (patellar reflex) and learned reflex (ruler catching).
APRIL 20 – SENSORY PHYSIOLOGY
Resources: Van Putte Textbook Section 14.1, 15.1, 15.2, 15.3 15.4 and Exercises 22, 24, 25, 26 in your abbreviated Marieb Lab Manual.
GENERAL SENSATION:
Exercise 22: Complete the exercises on Two-Point Threshold, Testing
Tactile Localization, and Adaptation of Touch Receptors.
VISION:
Exercise 24: Complete the visual experiments, Activities 1-7. This includes: Demonstrating blind spot, Determining near point of accommodation, Visual acuity with Snellen eye chart, Testing for astigmatism, Testing for color blindness with Ishihara color plates, Testing for depth perception, Photopupillary reflex, Accommodation pupillary reflex, and Convergence reflex.
HEARING:
Exercise 25: Complete all of the hearing laboratory tests in Activity 4,[excluding audiometry]. This includes: Acuity test, Sound localization, Frequency range of hearing, Weber test, and Rinne test.
OLFACTION & TASTE:
Exercise 26: Complete the following experiments: Stimulating Taste Buds,
Olfactory Stimulation (on Taste), Taste and Olfaction in Odor Identification, and OlfactoryAdaptation.
APRIL 27 – EXAM THREE